7 Clever Things You Can Do with Handbrake

Handbrake is open source and completely free of any attached strings or shady offers; you only get what you download, nothing else. It has been released for over ten years and remains one of the best applications out there for ripping uncrypted DVD & Blu-ray disc and transcoding video files from one format to another.
It’s available for Windows, Mac, and Ubuntu with a GUI interface or as a command line tool. The latest version by now(Thu, 05-Jan-2017 10:27 AM) is Handbrake 1.0.0.
Read more: Handbrake Leatest Version 1.0.0 Features.
Here are some of the most ingenious uses of HandBrake to ensure that your viewing experience is as good as it can be.
1. Rip a DVD
Ripping DVDs is a great way to keep a backup and stream videos over your network. There are lots of programs available to help you do the DVD ripping task, but we bet you favorite program is the HandBrake, a completely free DVD ripper software wit a high reputation. Now we will guide you through the steps how you can rip DVD with Handbrake for free.
Step 1. Download and Install HandBrake
Step 2. Load DVD Movies
Step 3. Set Output Destination
Step 4. Choose Output Profile
Step 5. Rip DVD with HandBrake
Details of each step please turn to Rip DVD with Handbrake. Mac user please turn to this page for ripping DVD on Mac with Libdvdcss.
2. Rip a Blu-ray
HandBrake makes it clear in its supported sources list- "Any DVD or Bluray-like source: VIDEO_TS folder, DVD image, real DVD or Blu-ray (unencrypted removal of copy protection is not supported), and some .VOB, .TS and M2TS files."
That mean HandBrake converts neither encrypted physical Blu-ray Disc nor decrypted commercial Blu-ray movies in BDMV file structure.
But how to convert/rip Blu-ray with HandBrake?
Step 1. Download and install Handbrake 1.0.0 or above version and launch it.
Step 2. Under presets, select High Profile and then click Source > Video Files to add your Blu-ray files. You can add either M2TS or MKV Blu-ray files. In the BDMV folder, choose the STREAM folder and select the M2TS file.
Step 3. For the Container, you can choose to rip Blu-ray to MKV or MP4 according to your needs. And then you can set the output path by clicking Browse and find a folder to save the output files.
Tip:. Under Picture tab, you can set the video size according to your needs.
Step 4. Finally, Click Start on the top to start ripping Blu-ray to MP4 or MKV video. You will get your converted Blu-ray rips latter.
If you want to preserve the Blu-ray image and sound quality, you need to make some settings for Handbrake Blu-ray ripping. Read on to find how to rip Blu-ray with Handbrake.
| If you ripped all your DVDs and Blu-Rays, you could create an amazing media center. Of course the main obstacle to ripping is the disk's copy protection. The details of DVD Copyright Protection and wonder how to Remove Copy Protection from DVD Easily, please feel free to click here. For Removing BD+ Copy-protection and Rip BD+ Blu-ray Disc, this article should take into your consideration. |
3. Convert Videos for Use with iTunes and iOS Devices
There are plenty of different video file types out there, but it seems that Apple favours the MP4. If you have a video you want to import to iTunes and transfer to your iOS device, it needs to be an MP4 — thankfully, you can use HandBrake to turn any old filetype into an Apple-ready video.
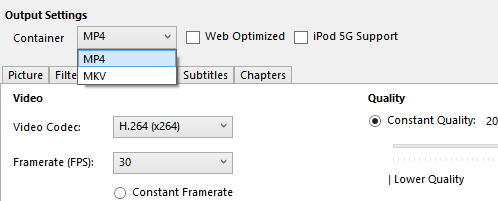
To do this, you can either use the many presets for Apple products that HandBrake offers up, or perform the switch manually. Simply look to HandBrake’s Output Settings section, and choose MP4from the Container drop-down menu. That same menu will also allow you to convert video files to MKV, a popular file format for online streaming video that can come in handy elsewhere.
When you’ve selected MP4 as your desired container, you simply need to select your desired source file and click Start to begin the process as normal. The finished MP4 file will be ready to be imported to your iTunes Library, and can then be transferred to another device of your choosing.
4. Batch Convert Multiple Videos at Once
Sometimes you might want to covert several video files all at once to save time - a full season of your favorite television show. You can do that with HandBrake, but you'll need to do some setup beforehand.
First, click through Tools > Options > Output Files,
then click Browse on the Default Path field.
Create a new folder for your converted video files to be stored in.
Now, close the Options window and select your Source, choosing a folder with multiple files rather than just a lone video.
Once HandBrake has scanned the contents of the folder, you'll be able to click Start and have it work its way through the queue.
Depending on the amount of video files you're converting and the specifications of your computer, this process could take some time - this task is best done overnight, or another time that you're not planning to be using your PC.
5. Add Subtitles to a Movie File
Whether you’re hard of hearing or a fan of foreign film, there are plenty of reasons why you might want to enjoy a movie with subtitles. Whereas at one time, getting your hands on a subbed film was a laborious and potentially costly process, now you can add the subtitles yourself.
| Just do some searching using “movie title” + “your preferred language” + “subtitle” as the search strings, these typically come in .srt format, and can typically be located via a Google search. |
Once it’s downloaded, open up HandBrake and choose your Source video. Then, head to the Subtitles tab under Output Settings and click on Import SRT.

Once that’s done, simply open the video file in your preferred media player and activate subtitles as you would do normally. You’ll even be able to switch between different subtitle tracks if you added more than one during the process.
6. Denoise a Video
If you’re serious about your video quality, you can use HandBrake to denoise your file and thus increase its overall quality. In some cases, noise can be an intentional effect on the part of the filmmaker — but in others, it’s an unwanted imperfection, and those are the cases where Handbrake can step in to sort things out.
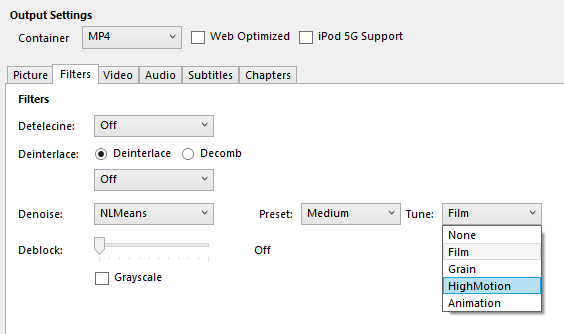
To access HandBrake’s denoising options, head to the Filters tab. You’ll be able to select either NLMeans — short for ‘non-local means’ — or hqdn3d as your denoiser. Both have their own strengths and weaknesses, depending on the sort of noise you’re trying to address, so it’s best to try out both to get an idea of how they work. The same goes for the preset and tuning options that you have access to, once you’ve selected one or the other.
| Denoising is a complex process, and it may take some practice before you’re able to use HandBrake’s tools to their greatest effect. |
7. Compress Video Files Size
Can't fill up your phone or tablets with a bunch of big video file size due to the limitation of storage space? Don't worry, with Handbrake, you are able to compress size with the following steps:
Step 1. Launch Handbrake, click the "Source" button to browse and select the large video file you desire to compress.
Tips!: You are suggested to not change any of Handbrake's settings. All Handbrake presets can easily configure Handbrake to transcode your existing large video files to something better suited for your device.
Step 2. Specify a preset for your output profile. Handbrake offers 9 option under the Devices presets including Universal, iPad, iPod, iPhone & iPod touch, Apple TV, etc. Choose one according to your own preference.
Step 3. Click "Browse" button to define an output folder to store the converted video file.
Step 4. Hit on the green "Start" button on top-left to start the video compression process.
The conversion time will depends on the size of your video file and the speed of your, when the conversion is over, you will get a video with much smaller file size.
Tips & Tricks
- Rip Blu-ray with Handbrake
- Rip DVD with Handbrake Alternative
- Rip Protected DVD with Handbrake Mac
- VLC 2.0 Rip Encrypted DVD with Handbrake
- DVD to iTunes via Handbrake Alternative
- Fix Handbrake cannot Rip Disney DVD
- Convert Video_TS/VOB to MP4 with Handbrake
- Encode Blu-ray/DVD to H.265 with Handbrake
- Rip Hollywood Blu-ray/DVD with Handbrake
- Encode H.265 with Handbrake
- Handbrake New Features and Alternatives
- Handbrake input and Output Format
- 7 Things Handbrake Do
- Rip DVD Free with Handbrake
- Free Mac DVD Ripper
- Handbrake Alternative
- Best Ripit Alternatives
- Best DVD Decrypter Alternative
- Tip 5 Alternative to MactheRipper
- Format Factory Features/Instructions/Alternative
- Top 10 Ogmrip Alternatives
- Alternative to MakeMKV for Rip BD/DVD
- Alternative to Magic DVD Ripper
- Handbrake New Features and Alternatives
- Best Vidcoder Alternative
- Rip DVD with Best Handbrake Alternative
- Get MakeMKV Alternative
- Rip DVD with DVDfab Alternative Mavericks
- DVD to iTunes 12 Handbrake Alternative
- DVD43 Alternative to Rip DVD
- Handbrake Alternative
- MacTheRipper Yosemite Alternative
- FreeMake Video Converter Alternative Mac
- Best AnyDVD Alternatives for Handling Commercial DVD
- Get Format Factory Alternative for Mac
- MediaCoder Alternative for Mac
- Copy DVD Main Movie Only
- Copy Blu-ray Main Movie Only
- Backup DVD Whole Structure
- Backup Blu-ray Whole Structure
- Rip DVD on Windows 10
- Rip Blu-ray on Windows 10
- Rip DVD on macOS Sierra
- Rip Blu-ray on macOS Sierra
- Blu-ray & DVD Ripper Review
- Open Source DVD Ripper
- DVD Ripper macOS Sierra
- Top 5 FREE DVD Ripper
- Top 5 Best Blu-ray Ripper
- Top 5 Best DVD Players
- Top 5 Best Blu-ray Players
- Blu-ray vs DVD: What difference?
- Blu-ray & DVD Ripper for Plex Review
- Ripping Copy Protected Disney DVD Review
- Brorsoft DVD Ripper vs Winx DVD Ripper
- Brorsoft Blu-ray Ripper vs Leawo Blu-ray Ripper
- Brorsoft Video Converter Ultimate vs Wondershare Video Converter Ultimate
- [Review] Best 4K Blu-ray Ripper
- [Review] Comparison of Best Blu-ray to MP4 Ripper
- [Review] Comparison of Best DVD to MP4 Ripper
- Convert ISO files to MP4/H.264/H.265 Review
- Download Best Blu-ray Ripper Applications for Mac
- Download Free DVD Ripper Applications
- Review: Best Blu-ray Ripper & Blu-ray Copier 2016-2017
- Review: Best DVD Ripper & DVD Copier 2016-2017
- The Best DVD Ripper Software 2017
- The Best Blu-ray Ripper Software 2017
- The Best ISO Converter Software 2017
- Best Tool to Easily Rip your Blu-ray & DVD as Well as Videos 2017
Alternatives:
Copy/Backup
General Solution
Review
Social Connection
Copyright © Brorsoft Studio. All Rights Reserved.