DVD Playback: How to Play DVD on Android TV with Kodi
Kodi (formerly XBMC) is a free and open-source media player software, which is available for multiple operating systems and hardware platforms, such as Android TV. It allows users to play and view most streaming media, such as videos, music, podcasts, and videos from the internet, as well as all common digital media files from local and network storage media.
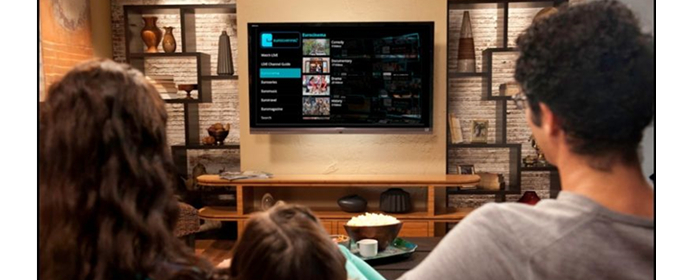
If you have large numbers of DVD discs, watch DVD movies on Android TV by adding all of the movies into Kodi library without physical disc and DVD player would be great.
We’ve already described the process of installing Kodi on Android TV here, so if you haven’t done that yet, go do that now. Then come back here, where we’ll show you how to rip DVD to Kodi supported digital format for watching on Android TV.
From Official Kodi WiKi, the Kodi support format list as below:
Container formats: AVI, MPEG, WMV, ASF, FLV, MKV/MKA (Matroska), QuickTime, MP4, M4A, AAC, NUT, Ogg, OGM, RealMedia RAM/RM/RV/RA/RMVB, 3gp, VIVO, PVA, NUV, NSV, NSA, FLI, FLC, DVR-MS and WTV
Video formats: MPEG-1, MPEG-2, H.263, MPEG-4 SP and ASP, MPEG-4 AVC (H.264), H.265 (as from Kodi 14) HuffYUV, Indeo, MJPEG, RealVideo, RMVB, Sorenson, WMV, Cinepak.
In this case, for adding DVD movies to Kodi library, you'd better rip the DVD to Kodi compatibel digital format. on the side, as commecial DVDs are copy protected, it is very difficult to copy DVD movie content out of disc to kodi media library. Thus, you need a DVD ripper to bypass the DVD encryption and extract DVD to a digital file that Kodi supported, such as MP4, MKV, AVI, ect.
Here Brorsoft DVD Ripper will be the best choice to rip DVD for transfering to Kodi library and playing on Android TV.
• It can remove DVD encryption including CSS, region code, RCE, Sony ArccOS, UOPs, Disney x-project DRM, etc.
• It can convert DVD to Kodi 17 supported MKV, MP4, AVI, H.265, etc format video.
For Mac users, please use Brorsoft DVD Ripper for Mac which can copy DVD to Kodi 17 on macOS (Sierra included). You can read Mac review to learn more.
Steps to rip DVD for playing on Android TV with Kodi
The trail-before-purchase version availabel for you, the watermark is the only limitation between the trial version and full version. Here in this article, Windows version screenshots were taken as example, the Mac version shares the same steps, just keep in mind you have download the right version, Windows platform .exe files cannot be installed on macOS – and vice versa.


1. Add DVD movies
Click disc icon to select and import the DVD files you want to rip to this program. Loaded files can be previewed in the right viewing window and you can take snapshots of your favorite movie scenes.
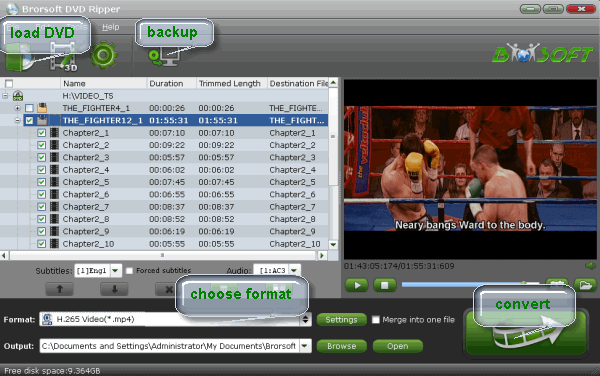
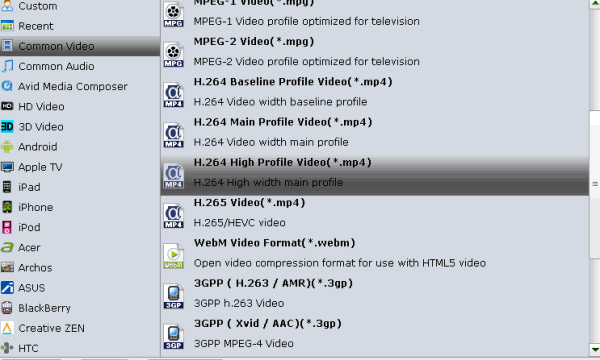
2. Choose output format
Generally, MP4 is recommended since it has wide acceptance, good video quality and small file size for playing on Android TV with Kodi.
Tip: With the right settings you can retain the quality of the original Blu-ray while also saving space. Simply click Settings bar and you can tweak the video size, bitrate, frame rate, etc.
3. Start ripping DVD
Click convert button to start converting DVD to H.264 MP4 for Kodi.
After conversion completes, press “Open” to locate resulted files.
How to add DVD (ripped) movies to Kodi library
1. open Kodi.
2. Select “Videos” in the home screen menu.
3. Seclect Files, then select “Add Videos”.
4. Click on “Browse” button.
This requester you can select the location where your DVD movies are located on your system. You can also choose a network drive if you have transfer the ripped DVD movies to there.
5. In the next screen you should see the directories within your selected directory.
If this is the right directory select “OK”. If all is ok then select “OK” again.
In the next screen is where we tell Kodi what our source directory contains, in this case its “(Movies)”. When you are happy with the settings select “OK”.
6. Next screen is refresh info for contents of selected directory, select “Yes”.
When you’ve selected ok you will be presented with this next screen, keep an eye on very top almost to the right as this updates the database with info about the films it finds.
This item can take a long time depending on how many ripped DVD movies you have in your collection.
7. When finished, the ripped DVD movie library should be listed on the interface.
Related Products
Brorsoft DVD Ripper


Useful Tips
- Play AVI on LG Smart TV
- Play Video_TS on Sony TV
- Watch DVD on Samsung TV without DVD Player
- Convert ISO to LG TV
- Play DVD on Amazon Fire TV
- Play ISO files on Sony Bravia TV
- Rip Blu-ray DVD for TV via USB
- Play Video_TS/ISO on Panasonic TV
- Watch Blu-ray on Sony TV via DLNA USB
- Watch Blu-ray on NVIDIA Shield TV 2017
- Play Blu-ray on Amazon Fire TV
- Watch DVD on Nvidia Shield TV 2017
- Play ISO on Sony TV
- Rip 2D 3D Blu-ray for 3D TV
- Blu-ray to Samsung tv with H.265 Codec
- DVD to LG TV via Seagate Wireless Plus Plex
- Play BD/DVD on Samsung UHD TV
- Stream Blu-ray/DVD to TV with Chromecast
- Play Blu-ray on Android TV with Kodi
- Stream Blu-ray/DVD to Android TV
- Cast 4k Blu-ray/DVD to TV with Chromecast
- DVD to USB Stick for Samsung TV
- Watch DVD on Sony Bravia TV without DVD Player
- 2017 Top 5 Kids Movies on DVD
- Rip Blu-ray with AC3 and DTS 5.1 Surround Sound
- Rip DVD to Android Tablet/Phone
- Blu-ray to Android
- Stream Blu-ray DVD to Android TV
- Blu-ray to Android TV with Kodi
- Play Tvio Shows on Android Devices
- Install Kodi on Android TV
- Convert Video_TS to Android
- Install Plex App on ATV 4
- Watch DVD on Apple TV
- Play Video_TS via Apple TV
- Watch Blu-ray on Apple TV
- Enable Apple TV Play VOB Files
- Play ISO files on Apple TV
- Play 4K on Apple TV
Android Devices Guides:
Apple TV Related Guides:
Social Connection
Copyright © Brorsoft Studio. All Rights Reserved.