DVD Ripping: How to Keep Right Aspect Ratio for 16:9 and 4:3 Display
While you want to make a rip of a DVD for private use like for playback on HD TV or PC, you will be probably uncertain about the correct aspect ratio. What would be the correct resolution for a full-DVD-quality rip in the correct aspect ratio at maximum resolution? 720x400, 720x300 or other? What are the best fit for 16:9 widescreen and normal 4:3 display? In this page, we will give you some hints.
As you know, there are two aspect ratios supported by DVD: 4:3 (also called "Normal" or "Full Size") and 16:9 ("Wide Screen"). Both aspect ratios use the same picture size; however, the 16:9 (widescreen anamorphic) image is horizontally compressed on DVD and then stretched by the DVD player when viewing.

4:3 is the aspect ratio of a normal TV (Image 1). 16:9 is the aspect ratio of a widescreen TV (Image 2). A 16:9 feature will be letterboxed on 4:3 TV (Image 3) or Pan & Scan (Image 1).
Guide on ripping DVD keeping right aspect ratio for 16:9 and 4:3 display
Firs of all, download and install the DVD Convert app- Brorsoft DVD ripper

 ( Note: Click here for OS X 10.5)
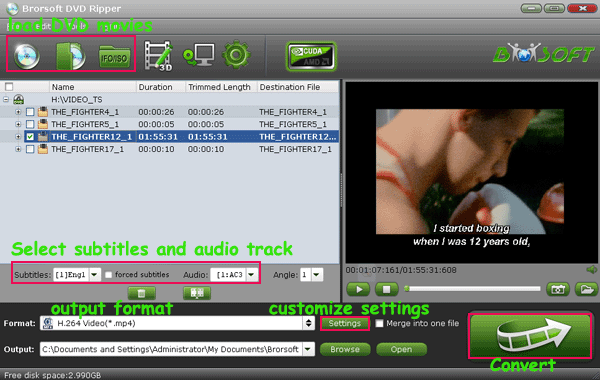
Overall, the best DVD Ripper just meets your needs, which can help you fast rip videos from DVD for playing on HDTV, PC, Apple TV, Galaxy Tab, Galaxy S4, etc or sharing on YouTube. With it, you can select desired subtitles and audio tracks for specific chapters; decide movie resolution, aspect ratio, bitrate and more. Besides, the built-in video editor lets you personalize your DVD by trimming, cropping, adding watermarks, adjusting video effects, etc. If you're using Mac, please turn to Brosoft DVD Ripper for Mac, which lets you convert DVD on Mac OS X (Lion and Mountain Lion included).
Step 1: Load DVD movie source
Launch the DVD ripping program, but before doing this, make sure there are no other decrypter tool running at the same time and make sure the Internet connection is fine. Insert your DVD disc into DVD drive. Then click the DVD disc icon to load DVD movie. If your DVD is saved as files on your computer, click "DVD Folder" and browse to the folder that contains DVD files.

Step 2: Choose a proper format
Click the Format bar, and choose a desired format. For playing common DVD rips (720*480 for NTSC, 720*576 for PAL) on HDTV, AVI, WMV, MP4 from Common Video profile list are the highly recommended output formats.
Step 3: Set best aspect ratio for 4:3 or 16:9 display
A. Best video display ratio for a 4:3 display
If your display screen or HDTV is in 4:3 aspect ratio, here you need to set nothing. The default settings will result in letterboxed DVD videos with black bars above and below like the below image (720*480, 4:3) shows.

B. Best video display ratios for a 16:9 display
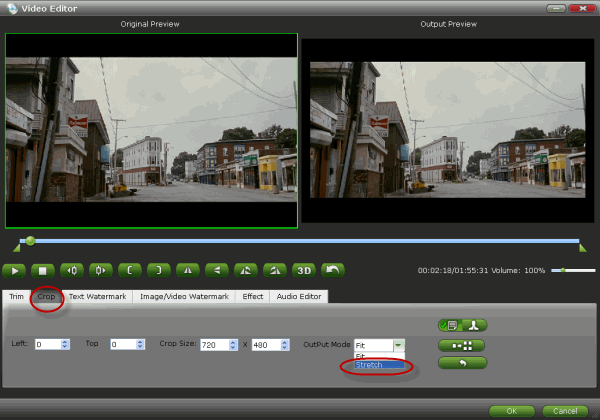
The videos created using the default format, however, does not look great on a 16:9 display. *If you want to get a 16:9 display and don??t mind the stretched picture, you can click the Edit button to enter the Video Editor -> Crop. You can select the output mode as Stretch.

Tip: Keep in mind that when it comes to DVD movies there is a formatting issue to consider. Many movies are wider than 16:9. For example, Seabiscuit, The Lord of the Rings, Dances with Wolves, Tombstone, The Fifth Element, U-571, American Beauty, and Star Wars/Phantom Menace (to name a few) are all 2.35:1, not 1.78:1. When you display these movies on a 16:9 screen you will have black bars at the top and bottom of the screen, each bar amounting to about 12% of the picture height. The bars are not as large as they would be on a 4:3 screen, but they are there nevertheless.
How to Get the black bars off?
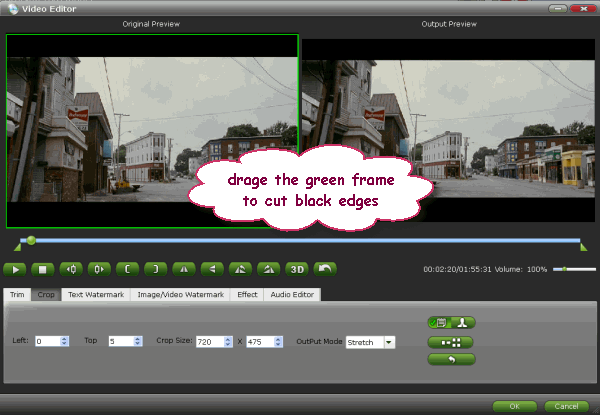
In the Video Editor interface, here you see the Original Preview and Output Preview area. The original video is put in green frame. Drag the dotted frame to crop black bar out as it shows below.

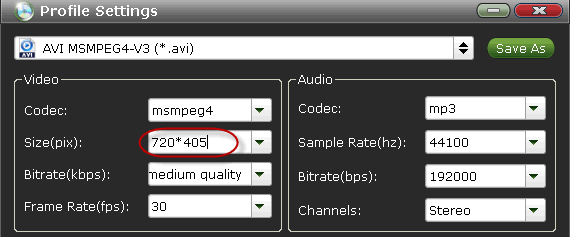
Additional tips: To avoid black bars when play DVD videos in full screen, you may click "Settings" button to set a video size of 16:9 in the "Settings" panel, for instance, 720*405, 800*450, 960*640, or 1280*720.

Step 4: Start converting DVD
After the settings, click the "Convert" button to start converting DVD to desired size (aspect ratio) for playing on (HD) device.
Useful Tips
- Rip DVD with Subtitles
- Digitize DVD on Mac
- Deinterlace DVD Movies
- Rip DVD Without Quality Loss
- New DVD Releases July 2018
- Convert DVD to Digital Files
- Rip DVD Chapters
- Rip DVD with Right Aspect Ratio
- Rip DVD for DLNA streaming
- Rip DVD Free with Handbrake
- Rip DVD to Android
- Copy DVD to iTunes library
- Rip Disney DVD on Windows/Mac
- Convert DVD to MP4 with Handbrake
- Fix Handbrake Cannot Rip Disney DVD with 99 Titles
- Remove DVD Copy Protection
- Rip Disney DVD on macOS High Sierra
- Free to Check Correct DVD Title
- Rip Car 3 DVD to MP4
- Rip BBC DVD to MP4/AVI/MKV
- DVD Ripping Solution for iPhone, iPad, Apple TV
- Rip DVD Despicable Me 3
- Rip Iron Man 3 DVD
- Rip DVD Game of Thrones
- Rip and Backup Shakespeare BBC DVD Collections
Copyright © Brorsoft Studio. All Rights Reserved.


