Trimming Video Clips in Video Converter Ultimate
Trimming is one of the most fundamental elements of editing. Trimming usually refers to taking off either part of the beginning or ending of a video clip. Sometimes this is referred to as trimming the top or tail (beginning or end).
Why Trim Videos ?
Trimming is critical to making sure that your video starts quickly and you don’t lose your audience’s attention. Your first five seconds of video are important to draw your viewers in and to set them up to be engaged and stick with the rest of your video. Trimming helps you to cut out any unnecessary introduction content or dead space.
For example, being a teacher is hard work, really hard work. They do not have a lot of minutes to spare preparing their lessons, nor do they have instructional minutes to waste. Oftentimes they have a video they want to share with theirstudents, but they only want them to see a few seconds of the video. In that case, find a powerful video trimmer is the best solution.
Most Brorsoft's converters allow people to trim video length so as to get desired video clip converted.
These converters include: Brorsoft Video Converter Ultimate, Brorsoft iMedia Converter for Mac, Brorsoft DVD Ripper for Mac and Wins, Brorsoft Blu-ray Ripper for Mac and Wins. All these media converters get the same operations on trimming video length. Check the below content to know how to trim video length with Brorsoft Video Converter Ultimate.
Showing Trimming with Brorsoft Video Converter Ultimate


With this professional video editing application, you can effectively keep any part of the video but remove the rest in Timeline editing.
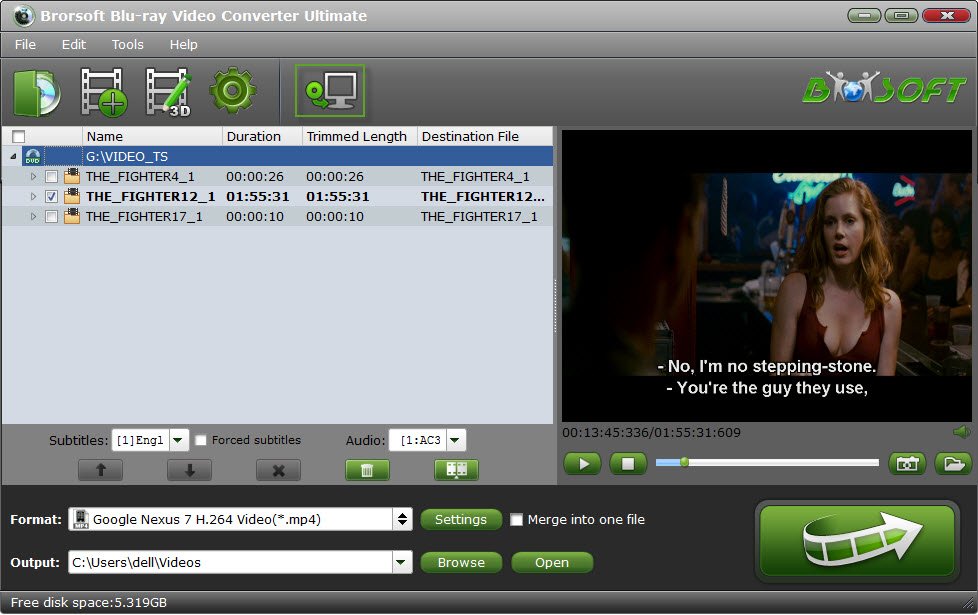
Step 1. Add the target files
First, click "File" on the primary windows and select video files from your computer, or simply drag and drop files to the User's Albums before adding them to the Timeline for trimming. This video editor supports almost all regular video formats, including MP4, FLV, AVI, 3GP, MOV, F4V, M4V, MPG, MPEG, TS, TRP, M2TS, MTS, TP, WMV, MKV, Blu-ray, DVD, ISO, Video_TS, VOB etc.
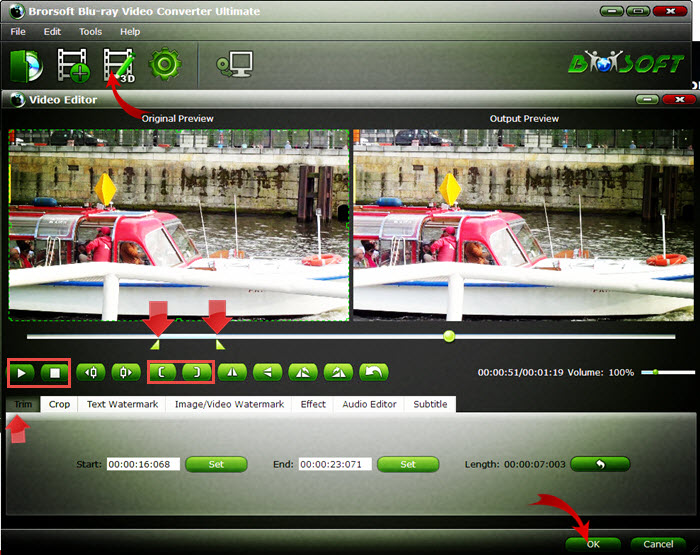
Step 2. Trim video clips on Timeline
Click Edit button on the main interface, then tap the Trim button. You could set the Start Time and End Time values and click OK to trim video length and get the video clip you need for converting. Or, you could directly drag the twin limiters on the player progress bar to trim video length. In the Clip Length, you could see the video length in output files.
 : Click to play source videos.
 : Click to pause playing.
 : Click to set as Start Time for trimming.
 : Click to set as End Time for trimming.
 : Click to reset the Start Time and End Time values for video trimming.
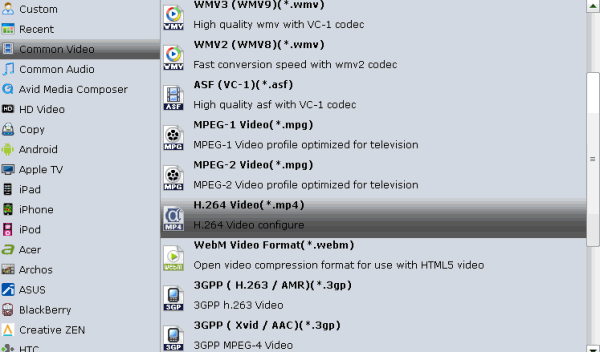
Step 3. Save your video
You can save video in other formats on your local computer by clicking "Format". Select the output file location, format and set the necessary parameters (frame rate, codec, video size, etc).
Then, click the big Convert button to start improving your videos. As soon as the conversion is done, simply click "Completed" to back to main interface, and click "Open" button to find trimmed videos. Just play and share.
Additional Tips:
Besides video trimming, Brorsoft provides other video editing features like adding Text, adding images, adding special effects, etc. Especially, the transition effect is very helpful to merge the two video clips.
Read More:
Related Products
Video Converter Ultimate


Useful Tips
- Rip Blu-ray with Dolby TrueHD 7.1 Audio
- Replace Audio Track in DVD
- TrueHD 7.1 MKV files to WMV
- FLAC to iTunes
- How to Trim Video Length
- DVD to USB Stick for Samsung TV
- Watch DVD on Sony Bravia TV without DVD Player
- Convert DVD to MP3/MP4 for Playback
- NAS Blu-ray/DVD to MKV Converter
- Copy DVD to PS4/PS3 without Regions
- Rip DVD to Plex Media Sever
- Play ISO files on Mac
- Play MKV on DVD Player
- Convert ISO to LG TV
- VR Headset Supported Video Formats
- Import MKV to Adobe Premiere Pro
- Convert BDMV files on Mac
- Cast MKV movies from Mac to Chromecast
- Play Video_TS on Windows
- Remove Blu-ray/DVD Region Code
- Rip Blu-ray to Plex Media Sever
- Convert/Import Blu-ray to iTunes
- Play AVI on LG Smart TV
- Convert ISO to Chromebook
- Stream DVD to Chromecast from PC
- Get Your Footage Synced up with Pluraleyes
- Blu-ray to MKV Play on Plex
- Video_TS to MKV Play on Plex
- Get Format Factory Alternative for Mac
- MediaCoder Alternative for Mac
- Best Freemake Video Converter Alternative
- Best Any Video Converter Alternative
- Best Avidemux Converter Alternative
- Cut/Split M2TS File from Blu-ray
- Convert ISO to MKV Store on NAS Drives
- ISO to MKV for Plex on ATV 4
- Blu-ray & DVD Ripper Review
- Open Source DVD Ripper
- DVD Ripper macOS Sierra
- Top 5 FREE DVD Ripper
- Top 5 Best Blu-ray Ripper
- Top 5 Best DVD Players
- Top 5 Best Blu-ray Players
- Top 6 Free Open Source Video Editors 2017
Blu-ray/DVD Review
Social Connection
Copyright © 2009- Brorsoft Studio. All Rights Reserved.