How to Import DVD Footage to Premiere Pro CC 2018 for Editing?

Adobe has released a brand new version of its beloved editing platform Premiere Pro CC 2018. With the update comes a jaw-dropping amount of performance updates, including some new features that promise to significantly increase post-production efficiency, and better support for 360-degree video, etc. For DVD fans, you can refer to this simple guide to import DVD footage to Premiere Pro CC 2018 for editing a breeze. Read on.
Though Premiere Pro CC 2018 doesn't support the DVD discs format as input, but we can get the movies off the plastic disc and convert DVD movies to Premiere Pro CC 2018 more compatible MPEG-2/MOV formats before importing. With our testing, we found Brorsoft DVD Ripper for Mac can do such big favor.
With it, you can effortlessly rip/convert any (protected) DVD to Premiere Pro CC 2018 and previous version supported formats without losing quality. Besides, this easy-to-use and professional DVD ripping tool also helps to convert DVD to more edit-friendly formats like: Apple Intermediate Codec(AIC) for iMovie, ProRes for Final Cut Pro X, DNxHD for Avid MC and more to satisfy your different needs. For Windows users, get the equivalent Windows version Brorsoft DVD Ripper.
Free download DVD to Premiere Pro CC 2018 Converter:


Guide: Convert DVD Movies to MPEG-2/MOV for Editing in Premiere Pro CC 2018
Note: Anywhere from 15 to 30 GB of hard disk space is needed depending on what you’re ripping. DVD are big, and we’re going to rip the whole thing to our drive first, so depending on the movie you’re ripping and the quality you want in your final movie file, you’ll need a good amount of space.
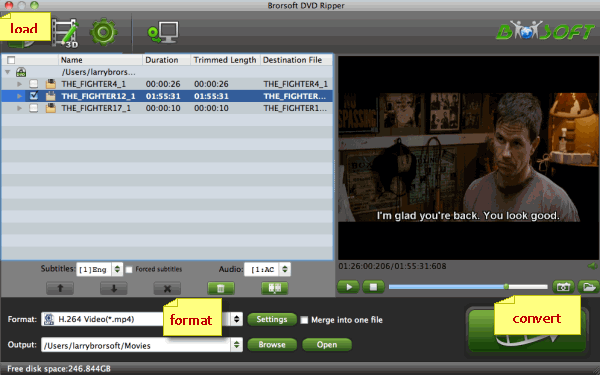
Step 1. Load DVD movies
First, insert your DVDs into DVD Drive, and then drag the DVD files to the program; Or you can click "Disc" icon to draw into DVD movies you want to rip. Alternatively, you can hit "ISO/IFO" button to import ISO files.
Step 2. Choose output format
Press the "Format" box and select Adobe Premiere/Sony Vegas - > MPEG-2(*.mpg) as output format and then set the output destination as you want.
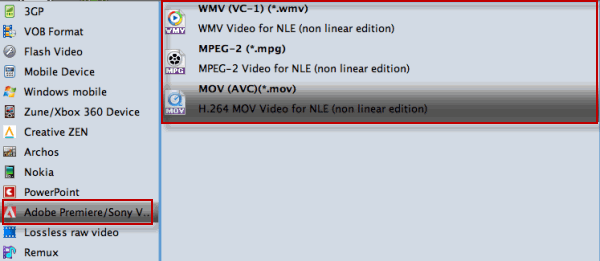
Tip: If you like, you can click "Settings" button right besides "Format" and enter "Profile Settings" panel to adjust video size, bit rate, frame rate, sample rate and audio channels.
Step 3. Start DVD to Premiere Pro CC 2018 Conversion
With above settings, click the "Convert" button to start ripping DVD to Premiere Pro CC 2018 edit-friendly formats. Once finished, you'll get the converted videos. Now you have no hassle to import and edit the converted DVD movies with Premiere Pro CC 2018.
Related Products
Brorsoft DVD Ripper for Mac


Useful Tips
- DVD to Pinnacle Studio Editing
- DVD to Final Cut Pro
- DVD to iDVD
- DVD to iMovie 11
- DVD to Sony Vegas
- DVD to Adobe Premiere
- DVD to Avid Media Composer
- DVD to Premiere Elements
- DVD to CyberLink PowerDirector
- DVD to Sony Movie Studio
- DVD to DaVinci Resolve
- DVD to Windows Movie Maker
- DVD to PowerPoint
- Import DVD to Edius
- Import DVD to Corel VideoStudio X10
- Import DVD to Lightworks Pro
- Import DVD to After Effects CC
- Import DVD Clips to VideoPad for Editing
- Import DVD Clips to Nuke for Editing
- Import DVD Footage to Premiere Pro CC 2018
- Import DVD Clips to Avid MC 2018
Social Connection
Copyright © Brorsoft Studio. All Rights Reserved.